

When you're ready to make your Shopify store truly your own, you've got three main paths you can take. You can stick with the built-in theme editor for simple tweaks, dive into the theme's code (CSS/Liquid) for more control, or bring in a Shopify developer for heavy lifting. Which one you choose really boils down to your comfort with technology, your budget, and how much you want to change.
Your Starting Point for Customizing Shopify Themes
Before you touch a single setting or line of code, it’s a good idea to have a clear plan. Figuring out the best approach from the get-go saves a ton of frustration later and makes sure you don't sink time and money into a dead end. Each option has its own pros and cons you'll want to weigh.
Here's a quick rundown of your choices:
- The Theme Editor: This is your most straightforward option. It's perfect for things like changing fonts, updating your color palette, or dragging and dropping sections on your homepage. It’s quick, free, and doesn't require any coding, but it won't let you change the core structure or functionality of your store.
- Editing the Theme Code: This is where you get some real power. If you’re willing to learn a little CSS and Shopify’s own language, Liquid, you can make targeted changes the theme editor can't handle. Think custom-styled buttons, a unique layout for your product pages, or other specific tweaks.
- Hiring a Developer: When you have a big vision—like a totally unique feature or a complete theme overhaul—your best bet is to partner with a Shopify expert. They can build custom solutions from scratch, but it's naturally the most expensive route.
To help you decide, let's look at these options side-by-side.
Comparing Your Shopify Customization Options
This table breaks down the three primary methods for customizing a Shopify theme based on technical skill, cost, and level of control.
| Method | Required Skill Level | Typical Cost | Level of Customization |
|---|---|---|---|
| Theme Editor | Beginner (No code) | Free | Low (Visual changes only) |
| Editing Theme Code | Intermediate (CSS/Liquid) | Free (DIY) | Medium (Specific layout/style) |
| Hiring a Developer | Expert (handled by pro) | $$$ – $$$$ | High (Unlimited) |
Ultimately, this comparison shows that there's a path for every skill level and budget, from simple visual updates to a completely bespoke storefront.
Choosing Your Customization Path
So, how do you pick? It often comes down to how comfortable you are with code. Interestingly, only a tiny fraction of store owners—about 0.97% of Shopify users—opt to build a theme from scratch. This tells us that most people find plenty of success by starting with a pre-built theme and making it their own.
This visual guide can help you figure out which path is the right fit for your current skills.
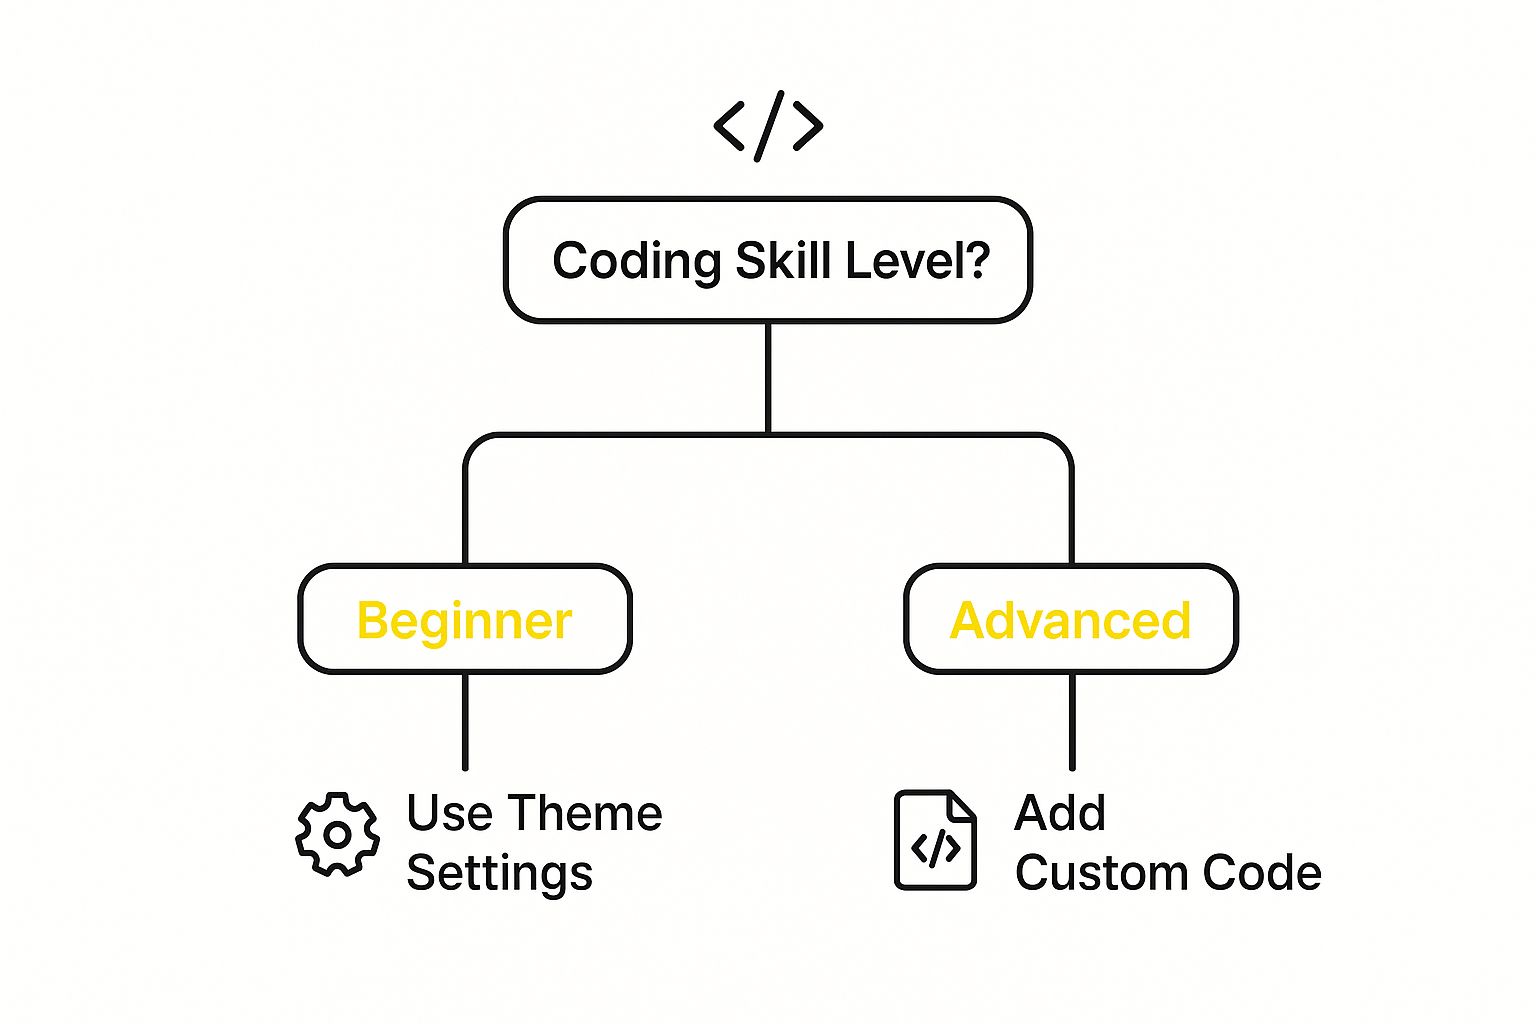
As you can see, the theme editor is the perfect launchpad for beginners. Direct code editing is for those who are a bit more adventurous. For a full breakdown of the entire process, you can learn more about how to customize your Shopify website.
Critical First Step: No matter which path you take, always duplicate your theme before you start. This creates an unpublished backup copy you can play with. If you make a mistake, you can just delete the copy and your live store remains untouched. It’s your safety net.
Quick Wins: Mastering the Shopify Theme Editor

Before you even dream of touching a line of code, your first stop should always be the Shopify theme editor. Think of it as your command center for making fast, high-impact changes. This is where you can customize Shopify themes with drag-and-drop sections and simple settings, making it the perfect starting point for any store owner. It's all about getting immediate results that your customers will actually see and feel.
The theme editor is so much more than a glorified color-picker. It’s a strategic tool for shaping your customer's first impression and guiding them through your store. Every change you make should support a business goal, whether that's boosting engagement or driving more sales.
For instance, a common problem I see is a high bounce rate on the homepage. You can start tackling this right away in the editor. Try moving a compelling announcement bar or a beautiful banner image with a strong call-to-action right to the top. This "above the fold" content is your first—and sometimes only—chance to grab a visitor's attention, so make it count.
Nail Your Brand's Visuals
Your brand’s personality needs to shine through consistently on every page. The theme editor puts you in direct control of the core visual elements that make your brand yours. My advice? Don't just pick colors you like. Choose a palette that truly reflects your brand's vibe and connects with your ideal customer.
Here are the key things I always focus on first:
- Color Palette: Don't stop at the primary color. Set specific colors for your text, buttons, accents, and backgrounds to create a truly professional and cohesive look.
- Typography: Pick fonts for headings and body copy that are both on-brand and easy to read. A high-end jewelry store might go for an elegant serif font, while a kids' toy store should probably use something more playful and friendly.
- Logo and Favicon: Make sure your logo is crisp and sized correctly in the header. And please, don't forget the favicon—that tiny icon in the browser tab. It's a small detail that makes a big difference in brand recognition.
These adjustments might seem minor, but they add up to create a polished, trustworthy storefront that encourages people to pull out their wallets.
Arrange Your Store's Layout for Sales
Most modern Shopify themes are built with modular sections you can add, remove, and reorder on pages like your homepage. This flexibility is your secret weapon for guiding customers where you want them to go. You can literally structure your homepage to tell a story and lead visitors toward a specific action.
A well-structured homepage isn't just a random assortment of pretty pictures. It's a sales funnel. By strategically placing featured products, customer testimonials, and trust badges, you build credibility and gently nudge visitors from just browsing to actually buying.
Let’s imagine you're launching a new product line. You could rearrange your homepage to lead with a massive banner for the new collection, followed immediately by a "Featured Collection" block showing off the new items, and then a "Testimonials" section to build social proof. This logical flow creates a powerful and direct path to conversion.
Of course, the theme editor can't do everything. It’s powerful for no-code changes, but it has its limits. You can't use it to invent entirely new features from scratch or fundamentally change the core layout built into the theme's code. Knowing what the editor can and can't do is key—it helps you recognize exactly when it's time to dive into more advanced Shopify theme customization.
Getting Your Hands Dirty: Editing Shopify Theme Code with CSS and Liquid
Sooner or later, you’ll hit the limits of what the standard theme editor can do. When that happens, it’s time to roll up your sleeves and dive into the code. This is where you can truly customize your Shopify theme and create a look and feel that’s uniquely yours, going way beyond the out-of-the-box options.
Don't let the idea of "coding" intimidate you. You don't need to be a seasoned developer to make some really powerful changes.
Your entire store's design and logic are built on two core technologies:
- CSS (Cascading Style Sheets): This is the fun part—it’s all about aesthetics. CSS controls the colors, fonts, spacing, and layout of every element on your site. Think of it as your store's digital interior designer.
- Liquid: This is Shopify's own programming language. It's what pulls in dynamic content like product names, prices, and images. Liquid is the engine that makes your store smart and functional.
By learning to make a few tweaks here and there, you’ll unlock a whole new level of control.
Finding Your Way Around the Theme Files
Before you change a single line of code, you need to know where to look. When you navigate to Online Store > Themes and click Actions > Edit code, you’ll be greeted by a list of folders and files. It can look like a lot at first, but you'll really only be spending your time in a few key areas.
Understanding this structure is half the battle. Here’s a quick breakdown of the most important folders you'll encounter:
| Folder Name | What It Does & What's Inside |
|---|---|
layout |
This is home to theme.liquid, the master template that wraps every page of your site. The header, footer, and other site-wide elements live here. |
templates |
Contains the core structure for specific page types. You'll find files like product.liquid for your product pages or collection.liquid for collection pages. |
sections |
These are the modular, drag-and-drop blocks you manage in the theme editor. Editing a file here affects that specific section everywhere it's used. |
snippets |
Home to small, reusable chunks of code. Things like product card layouts or social media icons are kept here to be easily included elsewhere. |
assets |
Your theme's piggy bank. It holds all static files like images, JavaScript, and most importantly, your main CSS stylesheet (usually named base.css or theme.css). |
For most simple design changes—like colors or fonts—you'll head straight for a file in the assets folder. For bigger structural changes, you'll probably start in templates.
My #1 Tip: Please, never, ever edit your live theme directly. Always duplicate your theme first and work on the unpublished copy. This gives you a safe sandbox to experiment in without any risk of breaking your live store.
Using Your Browser to Pinpoint What to Change
One of the most powerful tools in your arsenal isn't even in Shopify—it's your web browser's "Inspect" tool. It's like having X-ray glasses for your website.
Just right-click on any element you want to change—a button, a title, anything—and select "Inspect."
This pops open a developer console that shows you the page's HTML on one side and the corresponding CSS on the other. You can see the exact CSS class or ID you need to target. Even better, you can test out changes right there in the browser before you even open your theme's code editor. This completely removes the guesswork.
Small, focused tweaks can make a huge difference. For example, studies have shown that stores focusing on mobile experience and page speed can see mobile conversion rates jump by over 15%. Using the inspector to adjust button sizes or font legibility on mobile is a perfect, practical application of this. You can find more data on how different features impact conversion rates.
Simple Code Edits You Can Make Right Now
Ready to give it a try? Let's walk through a common example. Imagine you want to restyle your "Add to Cart" buttons.
First, you'd use the "Inspect" tool to find that the button has a CSS class of .product-form__submit-button. Now you know exactly what to target.
Next, navigate to your main CSS file in the assets folder. Scroll all the way to the bottom and paste in this snippet:
/* Custom Add to Cart Button Styles /
.product-form__submit-button {
background-color: #ff5722; / A vibrant orange /
border: 2px solid #ff5722;
border-radius: 50px; / Makes the button a pill shape */
font-weight: bold;
}
.product-form__submit-button:hover {
background-color: #e64a19; /* A darker orange for hover */
border-color: #e64a19;
}
Just like that, you've transformed your generic button into a bold, pill-shaped orange button that darkens on hover. It's a small change that makes your site feel much more polished and engaging.
Building Your Own Custom Theme Sections

Sooner or later, you'll want a feature your theme just doesn't have out of the box. Maybe it's a unique "Meet the Team" showcase or a slick, custom-designed lookbook. When that happens, building your own theme section is the answer.
This is where you get to move beyond just tweaking existing code and start creating brand-new, reusable components from scratch. It’s one of the most powerful ways to customize Shopify themes because it gives you total creative control. Think of it as being handed a fresh set of LEGOs—you can build whatever you can imagine, and it will be a perfect fit for your brand.
The magic happens when you create a new Liquid file inside your theme's sections directory. This file holds two key things: the HTML that gives your section its structure, and a special schema tag that defines settings for the Shopify theme editor. This means you (or your client) can update the section later without ever having to look at the code again.
Creating Your First Custom Section
Let's walk through a real-world example together: a 'Team Showcase' section. It's a common request, but surprisingly, many themes don't include it. Our goal is to create a section where you can add team members one by one, each with their own photo, name, and role.
First things first, head into your theme's code editor and locate the sections folder. From there, click "Add a new section," give it a clear name like team-showcase.liquid, and create the file.
Shopify will drop in some boilerplate code. You can go ahead and delete it all to start fresh. We'll be focusing on two parts: the HTML at the top and the {% schema %} block at the bottom.
A quick tip from experience: Creating custom sections isn't just about visuals. It's about building a more flexible and maintainable store. Every section you create becomes a reusable asset, empowering you to change your site's layout and content on the fly right from the theme editor.
As you design these new elements, always keep the user in mind. It's worth brushing up on user interface design best practices to ensure your custom creations are not only beautiful but also intuitive for your customers to use.
Defining the HTML and Settings
The schema is what turns a static piece of code into a dynamic, customizable section. It's basically a JSON object that tells the theme editor which settings to show. For our team showcase, we'll need a main heading for the entire section and then repeatable "blocks" for each person on the team.
Here's what we'll define in the schema:
- A text setting: This will let you edit the section's title, like "Our Team" or "Meet the Experts."
- Repeatable blocks: Each block will represent one team member and will contain its own set of settings:
- An
image_pickerto upload their photo. - A
textfield for their name. - Another
textfield for their job title.
- An
Back in the HTML part of the file, we'll use Liquid to loop through these settings and display the content. For example, you'll call the main heading with {{ section.settings.heading }} and then loop through section.blocks to generate the HTML for every team member added in the editor.
Here’s a simplified code snippet showing how it all comes together:
{{ section.settings.heading }}
{% endif %}
{{ block.settings.name }}
{{ block.settings.title }}
{% endfor %}
{% schema %}
{
"name": "Team Showcase",
"settings": [
{
"type": "text",
"id": "heading",
"label": "Section Heading",
"default": "Meet Our Team"
}
],
"blocks": [
{
"type": "member",
"name": "Team Member",
"settings": [
{
"type": "image_picker",
"id": "image",
"label": "Photo"
},
{
"type": "text",
"id": "name",
"label": "Name",
"default": "Employee Name"
},
{
"type": "text",
"id": "title",
"label": "Title",
"default": "Job Title"
}
]
}
],
"presets": [
{
"name": "Team Showcase"
}
]
}
{% endschema %}
Once you save this file, go back to the theme customizer. You'll now see "Team Showcase" in the list of available sections to add to a page. Mastering this process is a fantastic gateway into more advanced Shopify custom theme development, and you can adapt this same blueprint for almost any feature you can dream up.
Staying Safe with Customization Best Practices
https://www.youtube.com/embed/ElIk_2hqhTE
Diving into your theme’s code is exciting, but it’s easy to get carried away and accidentally break something. Before you make a single change, it's smart to adopt a few habits that will protect your store from crashes, slowdowns, and future maintenance headaches. Think of it as your pre-flight checklist.
The most important rule? Never, ever work on your live theme. Seriously. Always make a duplicate first. This gives you a safe sandbox to play in. If you make a mistake that crashes your product page, who cares? Your customers will never see it. You can just delete the duplicate and start over.
For developers, this usually involves sophisticated tools like GitHub for version control, which lets you track every single change and roll back to previous versions in seconds. But for most store owners, simply duplicating your theme is the easiest and safest way to go.
Keep Your Code Clean and Fast
As you start adding custom CSS or Liquid, your theme files can get messy—fast. This doesn't just make it harder to find things later; it can actually slow down your website. Clean code isn't just a "developer thing." It's essential for anyone who wants a healthy, high-performing store.
Here are a few simple rules I always follow:
- Comment Your Code: Leave yourself little notes explaining what you did. A simple
/* Custom button styles for homepage */can save you hours of confusion six months from now when you can't remember why you added a certain piece of code. - Don't Repeat Yourself (DRY): If you find yourself pasting the same code snippet in multiple files, it's time to turn it into a reusable snippet. This keeps your theme much leaner and far easier to update down the road.
- Optimize Your Images: This is a big one. Huge, uncompressed images are one of the most common reasons for a slow website. Before you upload any image, run it through an optimization tool first. It makes a massive difference.
Your store's speed isn't just a technical metric; it's a huge part of the customer experience. While all Shopify themes are built to be fast, custom code and large media files can easily bog them down. A slow site hurts your SEO rankings and, more importantly, frustrates customers—which directly hurts your sales.
Document Everything You Do
Finally, keep a simple log of the changes you've made. It doesn't have to be fancy. A basic document where you note what you changed, why you changed it, and where the code is located is perfect.
This little bit of documentation becomes priceless when you need to troubleshoot an issue or hire a developer to help you later on.
By following these practices—using duplicates, writing clean code, and documenting your work—you can ensure your efforts to customize your Shopify theme pay off. It’s what separates a successful project from a future maintenance nightmare.
Answering Your Shopify Theme Customization Questions
It's one thing to read a guide, but it's another to actually dive into your theme's code. Naturally, questions and a bit of hesitation are going to come up. Let's walk through some of the most common concerns I hear from store owners.
The biggest fear? Messing something up on the live store. I get it. That's why the first rule of theme editing is non-negotiable: always work on a duplicated theme. This creates a safe, unpublished sandbox for you to play in. If a change goes haywire, you haven't affected a single customer. You can simply delete the copy and start over, no harm done.
Then there's the performance question: "Will all this custom code slow my site down?" The honest answer is, it can. But it doesn't have to. The key is to be mindful. Always optimize your images before uploading them and keep your code as clean and minimal as possible. A snappy site isn't just nice to have; it's crucial for keeping customers happy and ranking well in search results.
A lot of people think you need to be a professional developer to make any real changes. That’s simply not true. While a pro gives you ultimate flexibility, you can absolutely learn to handle powerful customizations yourself. Tweaking button styles, adding new sections, and changing layouts are all within reach with a bit of practice.
But What if I Need to Undo Something?
You absolutely can! If you followed the golden rule and are working on a theme copy, you can just delete it and start fresh.
For smaller slip-ups within a single file, Shopify has a fantastic built-in feature. Inside the code editor, look for the "Older versions" link. This lets you revert that specific file back to a previous save from the last few hours or days. It's a real lifesaver when you accidentally delete the wrong line of code.
For a deeper dive into making safe and impactful edits, our guide on the top Shopify theme customization tips is full of practical advice to help you avoid those common first-timer mistakes.
Ready to bring in a professional? The E-commerce Dev Group team specializes in custom Shopify design, development, and ongoing support to help you scale. We'll handle the technical heavy lifting so you can focus on growing your business. Visit us at https://scaleshopify.com to see how we can help.