
When we talk about speeding up a website, it’s not about one magic fix. It’s about a handful of smart, targeted improvements: compressing images, setting up browser caching, cleaning up your code, and using a Content Delivery Network (CDN).
These are the big-ticket items that tackle the most common bottlenecks, and they're exactly what we're going to walk through. Getting these right is how you deliver a genuinely fast experience to every single person who visits your site.
Why Website Performance Is Your Most Important Metric

Before we get into the nuts and bolts of optimization, let’s be clear about what’s at stake. A slow website isn't just a minor inconvenience; it's a silent business killer. It frustrates visitors, tanks your conversion rates, and tells search engines you don’t offer a good user experience. Every millisecond really does matter.
The Real-World Cost of a Slow Website
Online, patience is a resource in very short supply. People simply won't wait. Studies have consistently shown that 53% of mobile users will leave a page if it doesn't load within three seconds. Poof. They're gone, and they're probably not coming back. You can find more fascinating stats on this in this web performance optimization article on dev.to.
This isn't just about lost traffic, either. It directly impacts your bottom line and your visibility on Google. Search engines see high bounce rates as a red flag, which can hurt your rankings over time. In a way, a sluggish website is telling both your audience and the search algorithms that you don't respect their time.
Just think about this: a one-second delay in mobile load time can torpedo your conversion rate by up to 20%. For an e-commerce shop, that’s not just a number—that’s a pile of abandoned carts and lost revenue.
The Four Pillars of Website Performance
So, how do we build a truly fast website? We need a solid plan. The rest of this guide is built around four core pillars of optimization. If you can get these right, you’ll see massive improvements in your site's speed and responsiveness.
Before we dive deep into the how-to for each of these areas, here’s a quick overview of what we’ll be covering. Think of this as our roadmap to a faster site.
| Optimization Area | Primary Goal | Impact on Speed |
|---|---|---|
| Caching | Store parts of your site locally to reduce server requests. | Huge. Drastically cuts load times for repeat visitors. |
| Image Optimization | Shrink image file sizes without sacrificing quality. | Significant. Images are often the heaviest assets on a page. |
| Code Minification | Remove unnecessary characters from HTML, CSS, and JavaScript. | Moderate. Cleans up code, making files smaller and faster to parse. |
| CDN Setup | Distribute your site's assets across a global server network. | Major. Delivers content from a server physically closer to the user. |
Each of these pillars tackles a different aspect of how your website is delivered to your visitors. By working through them one by one, you’re not just patching a problem; you're building a comprehensively fast and reliable experience from the ground up. Let's get started.
Mastering Image And Media Optimization
Let's be honest, images and videos are usually the heaviest things on a webpage. They're almost always the main culprit behind slow load times. So, if you're looking for a big win in your quest for a faster website, this is the place to start. It’s not just about shrinking files; it’s about being smart.
The first move is picking the right format for the job. Modern formats like WebP and AVIF are a game-changer. They offer way better compression than old-school JPEGs and PNGs, which means you get smaller files with virtually no drop in quality. For many websites, just making the switch to WebP can slash image file sizes by 25-35%.
Lossy vs. Lossless Compression: What's The Difference?
When we talk about shrinking files, we're talking about compression. It comes in two main flavors: lossy and lossless.
- Lossless Compression: This is for when every single pixel counts. Think technical diagrams, logos, or icons. It reduces file size without throwing away any data, but the savings are pretty modest.
- Lossy Compression: This is your secret weapon. It intelligently removes tiny bits of data you’d never notice to make the file significantly smaller. For most photos on your site, a little bit of lossy compression is completely invisible to the human eye but gives you a huge performance boost.
Think of it this way: lossless is like a perfectly folded map, while lossy is a high-quality photocopy. It gets the job done just as well for most people, but it's a whole lot lighter. Don't let the word "lossy" scare you; it’s your best friend for web photos.
For anyone moving their store to a new platform, getting this right is even more critical. If that's you, our ultimate guide to media file optimization for Shopify migration digs into the finer details.
Get Your Dimensions Right And Use Lazy Loading
One of the biggest mistakes I see is people uploading a massive, high-resolution image and just letting the browser shrink it down. If your blog post only needs an image that's 600 pixels wide, uploading a 3000-pixel version is a colossal waste of your visitor's bandwidth. Always resize your images to the exact dimensions they'll be displayed at before you upload them.
There are great online tools for this, like Squoosh, which shows you a side-by-side comparison of your original image versus the compressed version.
You can play around with different formats and compression levels and see the impact on quality in real time. It really helps you find that perfect balance.
Next up is lazy loading. This is a simple but powerful technique. It tells the browser to wait on loading any images or videos until the user actually scrolls them into view. Why force someone to download a heavy footer image when they're still reading the first paragraph?
Lazy loading is a simple change that can have a profound impact. By deferring off-screen media, you prioritize the content your user sees first, which dramatically improves the perceived load time and metrics like First Contentful Paint (FCP).
This approach makes sure the initial page load is lightning-fast, focusing on delivering a great experience from the very first second. When you combine modern formats, smart compression, correct sizing, and lazy loading, you create a powerful workflow that keeps your site fast, engaging, and ready for your visitors.
Implementing Smart Caching Strategies
Caching is one of the quickest wins you can get for website performance, but it's a concept that trips a lot of people up. Let's break it down.
Think of caching as creating a temporary memory for your website. When someone visits your site, their browser has to download everything—images, stylesheets, fonts, and scripts. Caching is just a way of telling the browser, "Hey, hold onto these files for a while."
On their next visit, the browser pulls those files from its local storage instead of downloading them all over again from your server. This little trick makes a huge difference, slashing load times and making your site feel incredibly snappy for returning visitors.
Browser Caching The Low-Hanging Fruit
The first, and honestly the easiest, place to start is with browser caching. This is all about sending the right instructions (HTTP headers) from your server to a visitor's browser, telling it what to save and for how long.
For static files that almost never change—your logo, core CSS, or brand fonts—you can set a really long expiration date. It's common practice to set the Cache-Control header for a year on these assets. This means a visitor won't need to re-download them for a full 365 days, which is a massive speed boost.
By properly configuring browser caching, you can cut down the number of server requests by over 70% for returning visitors. That's a huge relief for your hosting and a much better experience for your users.
Server-Side Caching For Dynamic Content
Browser caching is a game-changer for static files, but it doesn’t do much for the dynamic parts of your site—things like a user's shopping cart or personalized content. That’s where server-side caching steps in.
With server-side caching, your server stores pre-built copies of your pages. So, instead of building a page from scratch every single time someone requests it, it can just serve up a ready-made version. Much faster.
There are a couple of key types:
- Page Caching: This stores the complete HTML of a page. It's perfect for content that doesn't change from user to user, like your "About Us" page or a blog post.
- Object Caching: This gets a bit more granular. It stores the results of complex database queries, which is a lifesaver for database-heavy sites like e-commerce stores. It stops your server from running the same slow queries over and over.
Setting this all up can sound intimidating, but most platforms offer plugins or built-in tools to handle the heavy lifting. If you're on WordPress, checking out the best WordPress caching plugins is a great starting point. For Shopify merchants, understanding the platform's unique system is key; our https://scaleshopify.com/2025/01/12/ultimate-guide-to-shopify-data-caching/ goes into all the specifics.
Ultimately, a truly effective strategy uses both browser and server-side caching to create a blazing-fast experience for everyone.
Streamlining Code And Reducing Server Requests

It’s not just big images that bog down a website. The very code that builds your pages—the HTML, CSS, and JavaScript—is often full of extra weight. Developers intentionally add comments, spacing, and descriptive variable names to keep the code readable for humans. That’s great for maintenance, but browsers don't need any of it. To them, it's just bloat.
This is where minification comes into play. It’s an automated process that systematically strips out all those unnecessary characters, comments, and spaces from your code files. You end up with a much smaller file that does the exact same job but is way faster for a browser to download and parse.
Every single kilobyte you can trim helps create a better experience, and that's critical for keeping people on your site. Slow performance is a real money-loser, costing businesses an estimated $2.6 billion annually. Plus, Google's data shows that when a mobile page load time jumps from one to seven seconds, the chance of a user bouncing increases by a staggering 113%.
Combining Files to Slash Server Requests
Shrinking your files with minification is a solid first step, but you can get an even bigger performance boost by reducing the number of files your site needs to load.
Think of it this way: every separate CSS or JavaScript file is another trip the browser has to make to your server. If your site calls for ten small CSS files, it has to make ten individual requests. That's a lot of back-and-forth. It’s often much faster to load one single, combined CSS file, even if it’s a bit larger, because it only requires one trip.
This process is called concatenation, and it’s all about bundling multiple files of the same type (like all your CSS) into one. By doing this, you drastically cut down on the number of HTTP requests, which is one of the most common performance bottlenecks out there.
Reducing HTTP requests is one of the most effective ways to speed up your site. Fewer requests mean less waiting around for the browser and a quicker path to getting your page fully rendered for the visitor.
Practical Tools for Code Optimization
Thankfully, you don't have to sit there manually deleting spaces from your code. There are fantastic tools that automate the whole process of minification and concatenation. The right one for you really just depends on your website's platform.
- For WordPress: Plugins like Autoptimize or WP Rocket are my go-to recommendations. They can minify and combine your files with just a few clicks in the dashboard.
- For Shopify: Look for apps in the Shopify App Store. Something like "Booster: Page Speed Optimizer" can handle these optimizations behind the scenes, tuned specifically for the platform.
- For Custom Builds: If you're working with a custom development stack, build tools like Webpack or Gulp are the industry standard. You can set them up to automatically optimize your code every time you save a change.
If you’re on WordPress, applying WordPress Development SEO best practices is key to getting this right. By using these automated tools, you can transform your site's code from bulky and inefficient to lean and fast, ensuring a much smoother experience for every visitor.
Set Up A Content Delivery Network
Even with the fastest server money can buy, you can't beat physics. If your web server is located in New York, a visitor from Sydney is going to experience a noticeable delay. That's latency, the time it takes for data to travel across the globe. This is exactly the problem a Content Delivery Network (CDN) was built to solve.
A CDN doesn't replace your web host. Instead, it works alongside it by creating copies of your site's "heavy" assets—things like images, CSS stylesheets, and JavaScript files. It then distributes these copies to a global network of servers, often called Points of Presence (PoPs).
When someone visits your website, the CDN intelligently serves those assets from the server closest to them. That New York server no longer has to do all the heavy lifting for the visitor in Sydney; a local server in Australia steps in. The result? A dramatically faster experience for everyone, everywhere.
This visual shows just how big of a difference a CDN can make for your global audience.
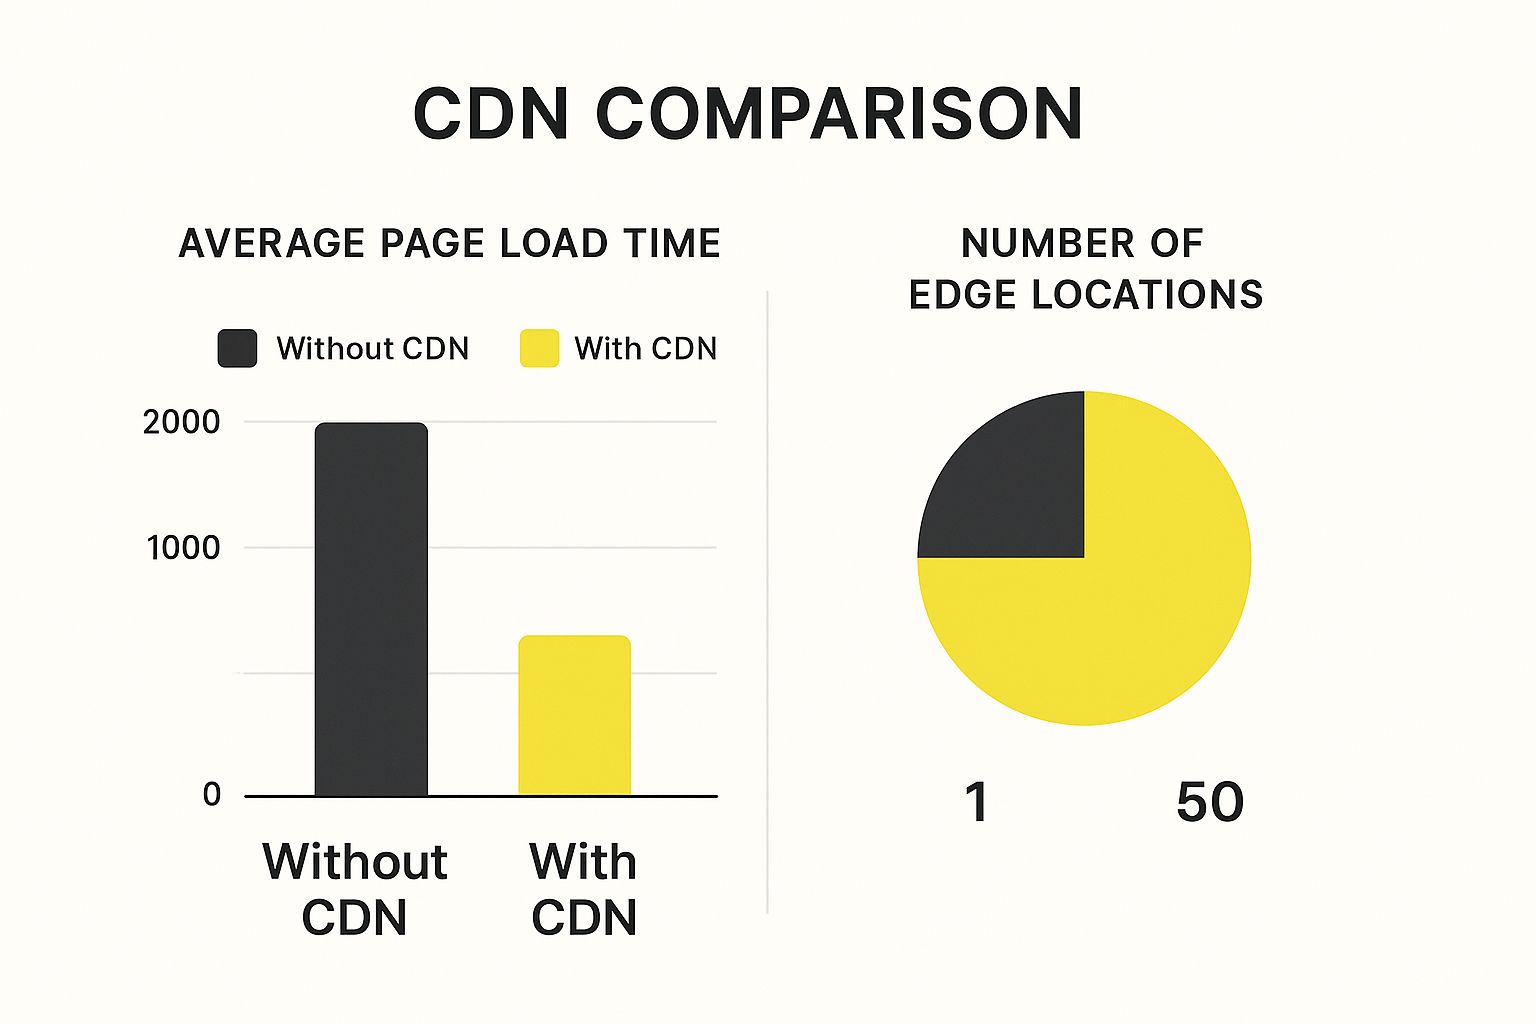
As you can see, by closing the physical gap between your content and your users, a CDN can slash load times by as much as 90%. It’s one of the most impactful changes you can make to deliver a near-instant experience.
Choosing The Right CDN Service
Getting started with a CDN is much easier than it sounds. There are some fantastic, user-friendly options out there that are perfect for almost any website.
- Cloudflare: Their free plan is legendary for a reason. It gives you a world-class global CDN, basic security against DDoS attacks, and a setup process that's incredibly simple. For anyone just getting started, it's a no-brainer.
- BunnyCDN: If you're looking for a pay-as-you-go model that's both affordable and high-performance, BunnyCDN is a popular choice. It offers more fine-tuned control, making it a favorite for developers and businesses with specific performance demands.
For most people, setting up Cloudflare involves a simple five-minute task: updating your website's nameservers at your domain registrar. Once you make that switch, it kicks in automatically, caching your content and routing visitors through its network. It's truly a "set it and forget it" performance boost.
To help you decide, here's a quick look at how some popular CDN providers stack up. This isn't an exhaustive list, but it covers the key features most people care about when they're just starting out.
CDN Provider Feature Comparison
| Feature | Cloudflare (Free Plan) | BunnyCDN (Standard) | AWS CloudFront (Pay-as-you-go) |
|---|---|---|---|
| Pricing Model | Free | Pay-as-you-go | Pay-as-you-go |
| Ease of Setup | Very Easy | Easy | Moderate/Complex |
| Free SSL | Yes | Yes | Yes |
| Basic DDoS Protection | Yes | Yes | Yes (AWS Shield Standard) |
| Image Optimization | Basic (Polish) | Yes (Bunny Optimizer) | Requires Lambda@Edge |
| Real-time Analytics | Limited | Yes | Yes |
Ultimately, the best choice depends on your budget and technical comfort level. For most users, starting with Cloudflare's free plan is a fantastic, risk-free way to see the benefits firsthand.
More Than Just A Speed Boost
The magic of a CDN isn't just about speed. By spreading your traffic across dozens or even hundreds of servers, you're building a more resilient website. If one server has an issue, traffic is automatically rerouted to the next available one. This distribution also takes a huge load off your primary web server, which can prevent it from crashing during a sudden traffic spike.
A CDN also acts as a powerful security shield. It sits between your website and your visitors, filtering out malicious bots, scrapers, and even large-scale DDoS attacks before they can ever reach your server.
This all ties back to what matters most: your business goals. Faster pages lead to happier users and better conversion rates. Industry data shows that pages loading in 1 second convert three times more often than pages that take 5 seconds. You can dig deeper into the impact of speed on conversions at wp-rocket.me. Adding a CDN is one of the single best moves you can make to get closer to that coveted one-second load time.
Common Website Performance Questions
Once you start digging into website optimization, a lot of practical questions naturally come up. You’ve got the main strategies down—optimizing media, setting up a CDN—but let's tackle the real-world concerns that pop up when you start putting it all into practice. This is about moving from theory to confident action.
Getting these details right helps you build a performance strategy that actually lasts. It's not about a one-time fix, but about creating a solid workflow that keeps your site fast and your visitors happy for the long haul.
How Often Should I Check My Website Performance?
Think of performance monitoring less like a one-off project and more like a regular health checkup for your site. You don't need to get obsessive and test it every day, but having a consistent schedule is the key to staying on top of things.
A great starting point is to run a full performance audit at least once per quarter. This gives you a clear baseline and helps you spot trends before they become problems.
Even more importantly, you should always test your site after making any significant changes. A few key moments to run a check are:
- After a big redesign: A new theme or layout can easily introduce new performance bottlenecks.
- When adding new apps or plugins: Every new piece of software adds code, and that code can have a real impact on speed.
- Following a large content update: If you just added a huge gallery of new photos or a bunch of videos, it's worth a quick check.
By testing at these critical moments, you can catch performance drops before they ever affect your customers. To get started, take a look at our guide on how to test website performance for a clear, step-by-step process.
What Is The Biggest Factor For A Slow Website?
While a lot of things can slow down a website, one culprit consistently stands out from the rest: unoptimized images. Time and time again, I see huge, high-resolution media files as the number one cause of sluggish page loads. A single uncompressed image can easily be bigger than all of your site's HTML, CSS, and JavaScript files combined.
This problem is even worse on mobile devices, where network connections aren't always great. Forcing a visitor to download several megabytes of image data just to see your homepage is a guaranteed way to send your bounce rate through the roof.
Because images have such a massive impact, your first priority should always be mastering compression, using modern formats like WebP, and implementing lazy loading. Fixing your images almost always delivers the biggest and most immediate boost in speed.
Can A Website Be Too Fast?
That’s a great question, and the short answer is no—a user is never going to complain that your site loaded too quickly. But you can definitely hit a point of diminishing returns. At a certain stage, the time and money you spend trying to shave off a few more milliseconds just won't deliver a noticeable benefit to your users.
The real goal isn't to chase a perfect 100 on every performance tool. It's about creating a smooth, frustration-free experience for the people visiting your site.
Focus on hitting these practical targets:
- Comfortably pass Google's Core Web Vitals.
- Get your Largest Contentful Paint (LCP) under 2.5 seconds.
- Make sure there's no noticeable lag or weird layout shifts as the page loads.
Once you’ve nailed the big wins—images, caching, and a CDN—you’re probably in a really good place. Spending weeks refactoring code just to save another 50 milliseconds is likely not the best use of your resources.
Does My Hosting Plan Affect Website Performance?
Absolutely. Your hosting is the foundation your entire website is built on, and it has a massive impact on speed. No amount of on-site optimization can ever truly make up for a slow, underpowered server.
Many people get started on shared hosting because it's cheap. The problem is, you're sharing server resources like CPU and RAM with dozens, sometimes hundreds, of other websites. If another site on your server gets a sudden flood of traffic, your site can slow to a crawl as a direct result.
For any serious business, upgrading is a no-brainer. A Virtual Private Server (VPS) or a managed hosting solution gives you dedicated resources, making your site's performance far more consistent and reliable. A better host directly improves your Time to First Byte (TTFB)—the time it takes for the server to send the very first piece of data. A faster server means the whole page load process gets a head start.
At E-commerce Dev Group, we specialize in turning Shopify stores into high-performance powerhouses. If you’re ready to stop losing customers to slow load times and want a site that truly converts, we’re here to help. Explore our custom Shopify development services today!