

Setting Up Your Development Workspace (Without the Headaches)
Diving into Shopify theme development without a proper workspace is a recipe for frustration. It's like trying to cook a gourmet meal in a messy, disorganized kitchen. A good setup isn't just about installing a bunch of tools; it’s about building a smooth workflow that lets you focus on creating an amazing theme, not fighting with your computer. Let’s skip the dry, textbook instructions and talk about what a practical, real-world setup actually looks like for developers who do this every day.
The first piece of the puzzle you absolutely need is the Shopify CLI. Think of this command-line interface as your direct line to the Shopify platform. It lets you create new themes, sync your local code changes to a development store, and run a local server that updates automatically. When you run shopify theme dev, it watches for any changes you make and reflects them in your browser almost instantly. This rapid feedback is a game-changer for development speed, saving you from the slow process of manually uploading files just to see a small CSS change.
Your Essential Toolkit
While there are tons of tools out there, most seasoned developers rely on a small, core set to get the job done efficiently. Before we dive into the details, here's a quick comparison of the must-haves for your development toolkit.
Essential Development Tools Comparison
Comparison of popular development tools and their features for Shopify theme development
| Tool | Type | Key Features | Best For |
|---|---|---|---|
| Visual Studio Code | Code Editor | Integrated terminal, vast extension library (e.g., Prettier, Shopify Liquid), Git integration | All-around theme development and customization. |
| Git & GitHub | Version Control | Change tracking, branching for new features, collaboration, code backup | Preventing code loss and managing project versions, especially for team projects. |
| Figma | Design Tool | Prototyping, component libraries, design-to-code features | Translating design mockups into functional theme elements with precision. |
A well-configured code editor like VS Code, paired with the right extensions, can automate your code formatting and spot errors before you even hit save. And seriously, start using Git from day one. It’s your safety net. It gives you the freedom to experiment with new features, knowing you can always roll back to a working version if things go wrong. This is the difference between a minor hiccup and a major disaster.
Development Stores and Market Context
Your development store is your personal sandbox, but it shouldn't be an empty one. To build a theme that works in the real world, you need to set up your store to look like a real merchant's shop. This means adding a mix of product types, creating collections of various sizes, uploading high-quality images, writing a few blog posts, and even creating some test customer accounts. This is how you catch layout problems and performance issues that only show up when you're working with actual data.
There's a huge demand for this kind of detailed work. As of the first quarter of 2025, Shopify powers around 2,583,875 live stores across the globe. This number isn't just sitting still; it grew by 6% year-over-year, which shows a constant need for unique, well-built themes that help merchants stand out. If you want to dive deeper, you can learn more about Shopify's impressive growth on StoreLeads.
This infographic helps visualize the different theme options merchants have, and it makes it clear why custom development is such a popular choice.
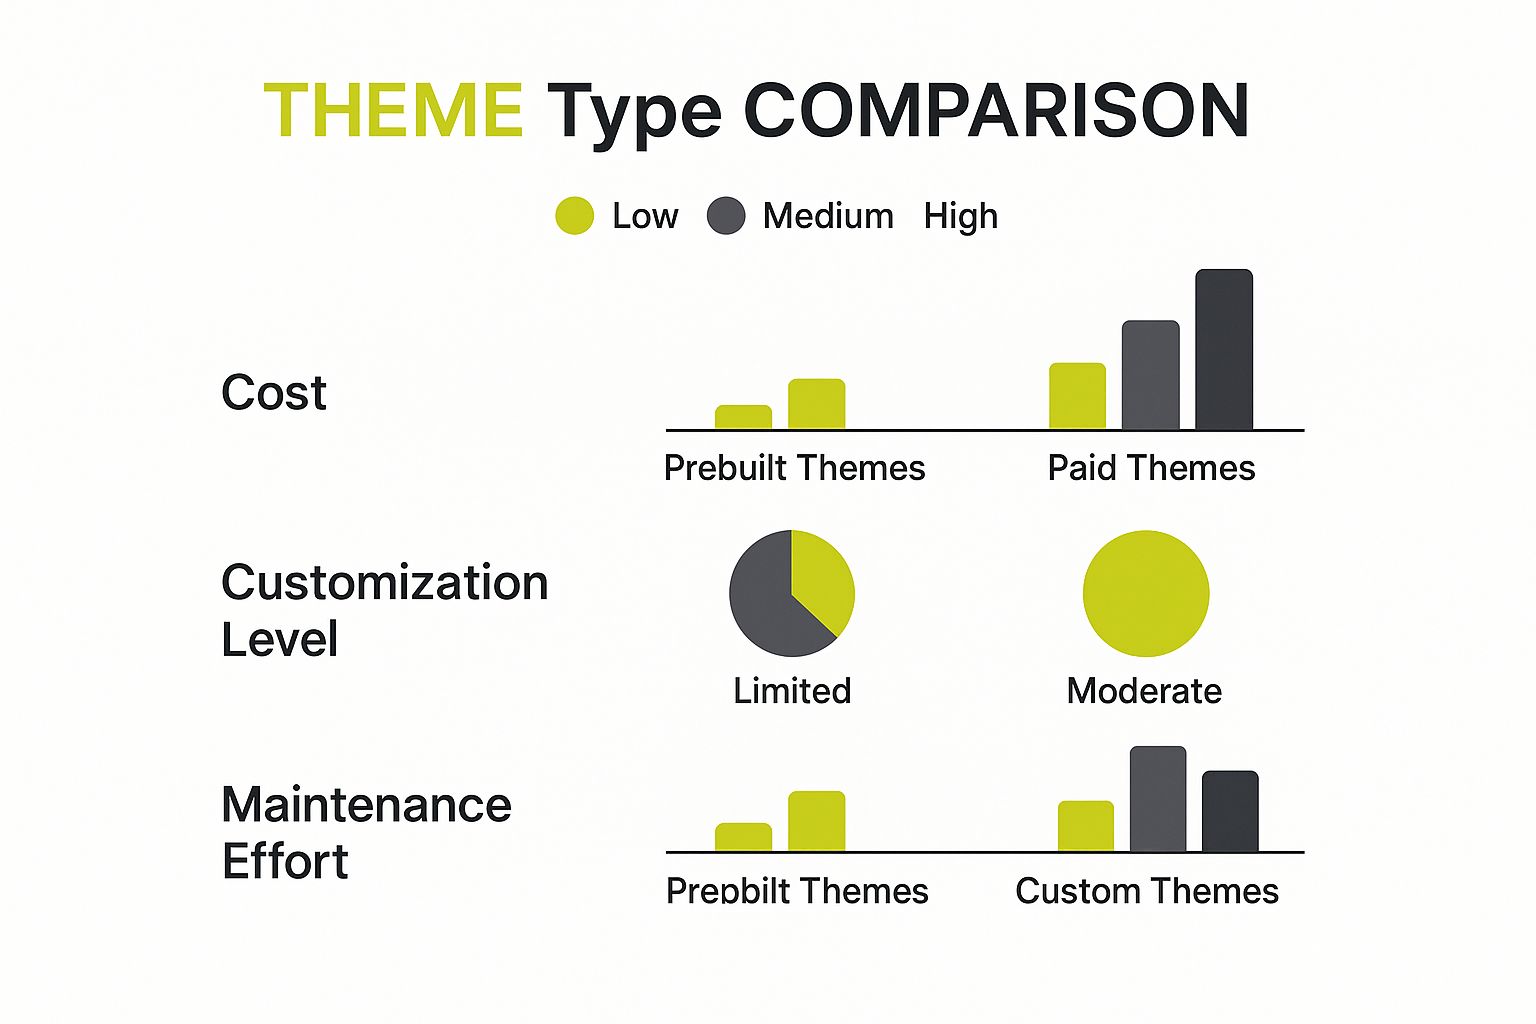
As you can see, building Shopify themes from the ground up gives you complete control over customization. While it requires a higher upfront investment and more maintenance, it's a trade-off many successful brands are happy to make for a store that truly reflects their vision.
Mastering Liquid Templates (Beyond the Documentation)

Once your local development environment is up and running, it's time to dive into the core of building Shopify themes. This is where you'll spend most of your time—getting creative with Liquid, Shopify’s templating language. While the official documentation is great for learning the basic syntax, real projects rarely stick to the script. Truly getting the hang of Liquid means knowing how to handle imperfect data, accommodate unique client requests, and keep the theme running smoothly.
Think of Liquid objects and filters like a chef's pantry. The docs give you the recipe for a simple meal, but an experienced developer knows how to mix and match ingredients to create something exceptional. It’s the difference between just showing a product title with {{ product.title }} and building smart logic that can handle whatever a merchant throws at it.
Practical Liquid Techniques for Real-World Scenarios
One of the first challenges you'll likely face is dealing with data that might not be there. A classic case is displaying a product's vendor. The documentation shows {{ product.vendor }}, which works great—until a merchant forgets to add a vendor to a product. The result is an awkward blank space on the page that looks unprofessional. A much better way is to use control flow tags to check if the data exists first.
{%- if product.vendor != blank -%}
Sold by: {{ product.vendor }}
{%- endif -%}
This simple if block makes your theme more resilient by preventing empty HTML elements. You can apply this same idea everywhere, from checking for product images to making sure a blog post actually has tags before you try to display them.
Another useful technique that's often overlooked is chaining filters. Filters are your secret weapon for manipulating data right in the template. You can take a string, strip out certain characters, and capitalize it all in a single, clean line.
For example, say you need to create a unique ID for a section based on its title, but the title might have spaces or weird characters. Chaining a couple of filters makes this a breeze:
{% assign section_id = section.settings.title | handleize | append: '-section' %}
Here, the handleize filter turns a title like "My Awesome Section" into a clean, URL-friendly "my-awesome-section". Then, the append filter adds a suffix to make it even clearer. It's an efficient way to generate reliable identifiers without cluttering your code with extra logic.
Moving Beyond Basics to Advanced Logic
As you tackle more complex features, you'll need to think more creatively. A common request is to show a "low stock" warning for products with fewer than 10 items remaining. This requires you to loop through a product's variants to check their individual inventory levels.
A straightforward approach would be to:
- Loop through each
variantinproduct.variantsusing aforloop. - Check the inventory with an
ifcondition like{% if variant.inventory_quantity < 10 and variant.inventory_quantity > 0 %}. - Show a warning message if the condition is met.
But what happens if multiple variants are low on stock? You'd end up with a messy, repetitive list of warnings. This is where you can use variables to add more control. By setting a "flag" variable to true the first time a low-stock variant is found, you can make sure the warning only shows up once. This kind of attention to detail is what separates a merely functional theme from a polished one.
This push for smarter, more user-focused features is central to modern theme development. Many new themes are now using technology to create more personalized shopping experiences, like showing AI-powered product recommendations based on a user's browsing history. To learn more about how the industry is moving in this direction, you can check out these evolving Shopify development trends at Hopiant. This forward-looking mindset is crucial for building Shopify themes that not only work flawlessly but also help merchants sell more.
Architecting Themes That Scale (And Stay Organized)
Once you’re comfortable with individual Liquid templates, it's time to zoom out and look at the bigger picture: your theme's architecture. A messy theme structure can quickly become a major headache, turning simple updates into a frustrating puzzle. On the other hand, a solid architecture makes building Shopify themes a much smoother process, supporting easy maintenance, team collaboration, and future growth. It’s the essential foundation for everything you build.
This isn’t about following strict, inflexible rules. It’s about creating a system that works for you and your team. A key part of architecting a strong Shopify theme is designing for long-term growth, a principle that's well-covered in these web application scalability tips. The goal is to make your theme's layout predictable and easy to understand.
Logical Folder Structures
How you organize your files is your first defense against a chaotic theme. While Shopify gives you a standard folder structure, you can improve it to bring more clarity, especially within your assets, snippets, and sections folders.
Think about adding subfolders inside your assets directory to keep different file types separate:
assets/css/for your stylesheetsassets/js/for your JavaScript filesassets/images/for theme-specific imagesassets/fonts/for any custom font files
This small change stops your main assets folder from becoming a cluttered mess. It’s a simple move that makes a big difference in finding files, especially as your project gets bigger. You can apply the same idea to your snippets. If you have a few snippets for the product card, why not group them in a snippets/product-card/ folder? This modular setup makes finding and updating related code much simpler.
Naming Conventions and Modular Code
Consistent naming will save you a lot of time and frustration, especially during those late-night coding sessions. A clear naming system, like the Block, Element, Modifier (BEM) method for CSS, helps prevent confusion and conflicting class names. For instance, instead of a vague .title, you would use .product-card__title. It’s far more descriptive and tells you exactly where that element fits.
Shopify's official documentation offers a great visual of the standard theme architecture, which is a perfect starting point for any custom setup.
This diagram highlights the main directories like templates, sections, and snippets, which all work together to build a page. By organizing files logically within these folders, you create a theme that’s easier to maintain and for other developers to jump into.
Writing modular code with reusable snippets is another crucial practice. Avoid repeating the same chunk of code on both the product and collection pages. Instead, create one snippet and include it wherever you need it. This "Don't Repeat Yourself" (DRY) approach means that when a change is needed, you only have to edit it in one spot. If you want to apply these architectural ideas to an existing store, our guide on Shopify theme customization has some great, practical advice. In the end, a well-architected theme isn't just powerful; it's a pleasure to work with long after the initial launch.
Creating Dynamic Sections That Merchants Actually Use

A solid theme architecture is the foundation, but the real magic for merchants happens in the dynamic sections. This is where they spend their time, tweaking their storefront to bring their brand to life. When you're building Shopify themes, the goal isn't to cram in every possible setting; it's to create intuitive controls that deliver powerful results. The best sections feel less like a developer's playground and more like a natural extension of their business toolkit.
I've seen a common pitfall where developers overwhelm merchants with choices. Imagine a section with dozens of individual color pickers, font size sliders, and margin inputs. While it seems like you're offering total control, it often leads to decision fatigue. A store owner doesn't want to become a web designer overnight; they just want to add a great-looking testimonial slider. A better approach is to provide curated choices. Instead of a color picker for every tiny element, offer a few well-designed color schemes like "Light," "Dark," and "Accent," which pull from the theme's global settings. This maintains brand consistency and makes customization a breeze.
Balancing Flexibility with Usability
Finding that sweet spot between power and simplicity is crucial. You want to empower merchants, not frustrate them. A great way to get a feel for this is by looking at what the most successful themes are doing. While the Shopify Theme Store has many options, a handful dominate the market. The free Dawn theme, for instance, is used by a staggering 25.2% of all Shopify stores because it’s fast, clean, and offers just enough customization to be versatile without being overwhelming. Themes like Debut and Refresh follow at 7.5% and 4.3% respectively, also prioritizing a clean user experience. By studying how these themes structure their section settings, you can gain valuable insights. If you're curious about these trends, you can find more Shopify usage statistics from WebFX.
To get a clearer picture of what works, let's look at some of the most common features in popular themes and break down their value.
Popular Shopify Theme Features Analysis
Analysis of key features and customization options in top-performing Shopify themes
| Feature | Usage Rate | Impact on Performance | Implementation Difficulty |
|---|---|---|---|
| Image with Text Overlay | High (90%+) | Low | Low |
| Testimonial Slider | High (85%+) | Medium (JS dependent) | Medium |
| Product Recommendations | Medium (70%+) | High (API calls) | Medium-High |
| Mega Menu | High (80%+) | Medium | Medium |
| Quick View / Quick Add | Medium (60%) | Medium-High | High |
| Predictive Search | Medium (55%) | High | High |
This data shows that the most-used features, like "Image with Text," are often the simplest to implement and have minimal performance impact. More complex features like "Predictive Search" are less common but can be a key differentiator if implemented well. The key takeaway is to focus on perfecting the core features that merchants use daily before adding more niche options.
Implementing Advanced Schema Techniques
You can make the merchant experience even better by using conditional settings in your section schema. With the show_if parameter, you can reveal certain options only when they are relevant. For example, you could have a checkbox for "Show 'Learn More' Button." The settings for the button's text and link would only appear if that box is checked.
This simple trick declutters the interface and guides the merchant through the customization process in a logical way. These small, thoughtful details are what separate a good theme from a great one—the kind of theme that merchants genuinely enjoy using and eagerly recommend to others.
Performance Optimization That Actually Moves the Needle

When you're building a Shopify theme, speed isn't just a "nice-to-have"—it's a critical feature that directly impacts a store's sales. A sluggish theme can torpedo conversion rates, but chasing every minor optimization tweak is a waste of time. The smart approach is to focus on high-impact strategies that really make a difference, saving you development headaches and delivering real value to your clients. It's about boosting speed without compromising the beautiful, engaging experience that shoppers expect.
One of the most common performance bottlenecks is unoptimized media. While Shopify’s global CDN does a great job with image compression, your theme is still responsible for asking for the right-sized image. It's a classic mistake to load a massive hero image and then shrink it with CSS to fit a small thumbnail space. Instead, use Shopify’s image_url filter with size parameters. For instance, {{ image | image_url: width: 400 }} instructs Shopify to serve an image that is 400px wide—way more efficient than wrestling with a 4000px giant.
Strategic Asset Loading
Beyond images, how you manage CSS and JavaScript is a huge factor. It might seem efficient to pack all your scripts and styles into one or two large files, but this can hurt performance. This forces users to download code for features they might not even encounter on a specific page. A better method is to have a core global.css for sitewide styles and then load section-specific or page-specific CSS files only where they're needed. The styles for a complex "Product Recommender" feature, for example, should only load on product pages where that section is active.
The same logic holds true for JavaScript. Lazy loading is an absolute must for any modern theme. This technique puts off loading images and videos that are "below the fold" until a user scrolls down to them, which can drastically cut down initial page load times. Be careful, though—a clumsy implementation can feel jerky and disruptive. The trick is to preload the first few images a user will see right away and then lazy load everything else. This gives the impression of a fast, responsive site. For more ideas, our complete guide on Shopify performance optimization covers additional strategies.
Prioritizing Mobile and Setting Budgets
A huge slice of e-commerce traffic comes from mobile, so a mobile-first design philosophy is non-negotiable. This is more than just making your layout responsive; it’s about designing and building for the constraints of smaller screens and slower networks from the very beginning. This forces you to prioritize essential elements and keeps your codebase lean and efficient by default.
When kicking off a new project, setting a performance budget is a game-changer. This is a clear set of limits you agree on, like keeping the total page weight under 1.5MB or ensuring a load time of under 3 seconds on a 4G connection. By using tools like Google PageSpeed Insights or GTmetrix to track your progress against this budget, you can catch performance issues before they become major problems. It turns performance from an afterthought into a measurable, concrete goal. To get a wider view on this topic, check out these essential website performance optimization techniques. By combining smart image handling, strategic asset loading, and a disciplined approach to budgeting, you'll be able to build themes that are not just beautiful, but blazingly fast.
Testing and Debugging Like a Professional
Launching a new theme without putting it through its paces is like setting sail in a boat you haven’t checked for leaks. Sure, it might float for a bit, but you’re just asking for trouble down the line. When you’re **building Shopify themes**, thorough testing isn’t just a final checkbox; it’s a continuous process that separates professional, reliable products from themes that buckle under real-world use. It’s about making sure things work perfectly for every merchant, on every device, every single time.
A good way to start is to imagine all the ways a merchant could use—and even misuse—your theme. What happens if they upload a huge, uncompressed PNG as their logo? What if they create a product with 200 variants? These aren't obscure edge cases; they're daily realities for store owners that can easily break a fragile theme. Your testing should be a deliberate effort to push your theme to its absolute limits.
Shopify-Specific Debugging and Browser Testing
When you're working with Shopify, a lot of debugging comes down to what's happening in your Liquid files. The Shopify Theme Inspector for Chrome is an absolute game-changer for this. It provides a "flame graph" that visually breaks down which Liquid renders are taking the most time to load. This can help you spot performance drains that are impossible to see just by looking at the code. For instance, you might find a for loop nested inside another for loop that's slowing down your entire collection page.
Just as important is cross-browser and cross-device testing. Your theme might look pixel-perfect on your high-end laptop running the latest version of Chrome, but how does it perform in Safari on an older iPhone? Or in Firefox on a Windows machine? These aren't just minor visual glitches; they can be major bugs that stop a customer from actually making a purchase.
To guide your process, here’s a practical QA checklist to work through:
- Stress-Test Content: Try adding products with no images, super long titles, or dozens of variants. Create blog posts with and without featured images to see how the layout adapts.
- Checkout Flow: Use Shopify’s Bogus Gateway to test the entire checkout process. Add items to the cart, apply a discount code, and complete the "purchase" to ensure everything is smooth.
- App Compatibility: Install a few popular apps from the Shopify App Store, like a product review app or a mega menu builder, to check for any conflicts with your theme's code.
- Mobile Experience: Don't just rely on your browser's responsive view. Test the actual user experience on a physical phone. Are the buttons easy to tap? Is the navigation intuitive with your thumb?
- Performance Metrics: Run your theme through Google PageSpeed Insights before and after adding all your demo content. This helps you catch any performance drops.
Building a Reliable Quality Assurance Workflow
The ultimate goal is to build a repeatable process that catches problems long before they ever get to a merchant. This involves creating clear and detailed reports for any bugs you find. If you want to handle issues efficiently, mastering essential bug reporting best practices is key. A solid bug report should always include what you did, what you expected to happen, and what actually happened, complete with screenshots and browser information.
When you take on an almost adversarial approach to testing your own work, you start building a reputation for quality. This mindset ensures the Shopify themes you create aren't just visually stunning but also robust, dependable, and ready for whatever a merchant throws at them.
Launching Themes and Managing Client Success
The final push of launching a custom theme is where all your hard work pays off. A smooth deployment isn't just about shipping code; it’s about paving the way for a strong client partnership and future referrals. This last phase of building Shopify themes is as much about managing relationships as it is about technical details. A well-planned launch can easily turn a one-off project into a long-term collaboration.
Staging, Coordination, and Training
A perfect launch starts well before you hit the "publish" button. A dedicated staging environment is a must-have. Think of it as a duplicate of the live store where you can test the final theme without any risk. This is your chance to do a last round of intense testing with actual products and content to catch any hidden bugs. If the project includes a store migration, this step becomes even more critical. You can get more insight on how to manage this in our comprehensive Shopify store migration guide.
Next, coordinate the launch time with your client’s marketing team. If they have a big campaign on the horizon, launching the new theme just before it can create some great momentum. On the flip side, deploying during a flash sale is a definite no-go. I always recommend aiming for a low-traffic window, like early on a weekday morning, to keep any potential disruptions to a minimum.
Once the site is live, your role shifts to empowering the client. Don't just hand over the login details and disappear. A little training goes a long way. I’ve found that a quick video walkthrough showing them how to use the custom sections you built is much more helpful than a dense PDF manual. Show them how to manage their content, update banners, and use all the new features. This small effort upfront dramatically reduces future support questions and helps them feel confident with their new site.
From Launch to Lasting Partnership
After the theme is live, the focus moves to maintenance and support. It's a good idea to have a clear process for handling any issues that pop up after launch. A simple ticketing system or even a dedicated support email ensures no request falls through the cracks. Offering a short, complimentary support period, say for 30 days, is a great way to build goodwill. For ongoing work, a structured retainer for updates can provide a steady income stream. This shows you're not just a developer they hired, but a real partner invested in their success.
Ready to create an exceptional Shopify experience that drives growth? The expert team at E-commerce Dev Group is here to bring your vision to life with custom theme development and dedicated support.